Showing posts with label Microsoft Office Word 2007. Show all posts

Preview and Print Documents

Leave a Comment
Preview and Print Documents
When you have your margins, tabs, and so on the way you want them, you are ready to print. In Word, You can preview your document before you print. In the Preview mode, you can review each page, view multiple pages at the same time, zoom in on a page, and access the Size, Orientation, and Margin options.
If you press the Zoom button while you are in Preview mode, the Zoom dialog box appears. In the Zoom dialog box you can set the sizes of the pages that display as well as the number of pages that display.
When you are ready to print, you use the Print dialog box. In the Print Range area, choose All to print every page of your document, choose Current Page to print the page you are currently on, or choose Pages to enter the specific pages you want to print. Type the pages you want to print in the Pages field. Separate individual pages with commas (1,3, 13); specify a range by using a dash (4-9).
Print Preview
·          Click the Microsoft Office button. A menu appears.
·          Highlight the Print option. The Preview and Print the Document menu appears.
·          Click Print Preview. The Preview window appears, with your document in the window.
·          Click One Page to view one page at a time. Click Two Pages to view two pages at a time.
·          To view your document in normal size, click 100%.
·          Click the Zoom Button. The Zoom dialog box appears.
·          Select an option and then click OK. Perform this task for each option and note the results.
Note: As you review your document, if you see changes you would like to make to the layout, use the Margin, Orientation, or Page Size options to make the changes. If you want to make other types of changes to your document, click the Close Print Preview button, to return to your document. Once you are satisfied with your document, you are ready to print.
Print
·          Click the Print button. The Print dialog box appears.
·          Click the down arrow next to the Name field and select the printer to which you want to print.
·          Choose All as the page range.
·          Click OK. Word prints your document.


Read More

Insert Page Breaks

Leave a Comment
Insert Page Breaks
As you learned in Lesson 1, you can display your document in any of five views: Draft, Web Layout, Print Layout, Full Screen Reading, or Online Layout. In Print Layout view you see your document as it will appear when you print it. You can clearly see where each page ends and a new page begins.
As you review your document, you may find that you want to change the point at which a new page begins. You do this by inserting a page break. For example, if a page heading appears on one page and the first paragraph under the heading appears on the next page, you may want to insert a page break before the heading to keep the heading and the first paragraph together.
Change to Print View

·          Choose the View tab.
·          Click Print Layout in the Document Views group. Your document changes to the Print Layout view.
Insert Page Breaks

·          Place your cursor before the D in "Displaced Homemakers"
·          Choose the Insert tab.
·          Click Page Break. Word places a page break in your document.
To delete a page break, you select the page break and then press the Delete key.


Read More

Add Page Numbers

Leave a Comment
Add Page Numbers
Page numbers help you keep your document organized and enable readers to find information quickly. You can add page numbers to the top, bottom, or margins of your pages, and you can choose where the numbers appear. For example, numbers can appear at the top of the page, on the left, right, or center of the page. Word also offers several number styles from which you can choose.
Add Page Numbers


·          Choose the Insert tab.
·          Click the Page Number button in the Header & Footer group. A menu appears.
·          Click Bottom of Page.
·          Click the right-side option.


Read More

Set the Margins

Leave a Comment
Set the Margins
Margins define the amount of white space that appears at the top, bottom, left, and right edges of your document. The Margin option in the Page Setup group of the Page Layout tab provides several standard margin sizes from which you can choose.
Set the Margins

·          Choose the Page Layout tab.
·          Click Margins in the Page Setup group. A menu appears.
·          Click Moderate. Word sets your margins to the Moderate settings.


Read More

Set the Page Size

Leave a Comment
Set the Page Size
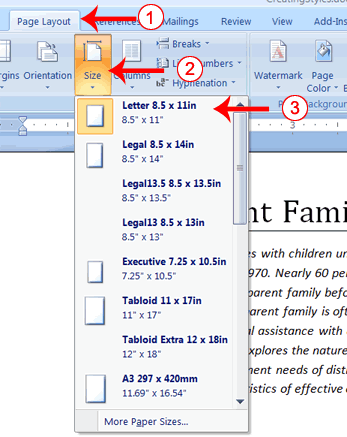
Paper comes in a variety of sizes. Most business correspondence uses 8 1/2 by 11 papers which is the default page size in Word. If you are not using 8 1/2 by 11 papers, you can use the Size option in the Page Setup group of the Page Layout tab to change the Size setting.
Set the Page Size

·          Choose the Page Layout tab.
·          Click Size in the Page Setup group. A menu appears.
·          Click Letter 8.5 x 11in. Word sets your page size.


Read More

Set the Orientation

Leave a Comment
Set the Orientation
Before you print your document, you may want to change the orientation of your pages. There are two orientations you can use: portrait and landscape. Paper, such as paper sized 8 1/2 by 11, is longer on one edge than it is on the other. If you print in Portrait, the shortest edge of the paper becomes the top of the page. Portrait is the default option. If you print Landscape, the longest edge of the paper becomes the top of the page.
Portrait

Landscape
Set the Orientation
 
·          Choose the Page Layout tab.
·          Click Orientation in the Page Setup group. A menu appears.
·          Click Portrait. Word sets your page orientation to Portrait.

Read More

Undo & Redo

Leave a Comment
Undo and Redo
You can quickly reverse most commands you execute by using Undo. If you then change your mind again, and want to reapply a command, you can use Redo.
Undo and Redo

·          Type Undo example.
·          Click the Undo button on the Quick Access menu. The typing disappears.
·          Click the Redo button on the Quick Access menu. The typing reappears.
·          Select "Undo example."
·          Press Ctrl+b to bold. Word bolds the text.
·          Press Ctrl+i. Word italicizes the text.
·          Press Ctrl+u Word underlines the text.
·          Click the down arrow next to the Undo icon. You will see the actions you performed listed. To undo the underline, click Underline; to undo the underline and italic, click Underline Italic; to undo the underline, italic, and bold click Bold etc.
·          To redo, click the Redo icon several times.
Alternate Method -- Undo & Redo by Using Keys
·          Type Undo example.
·          Press Ctrl+z. The typing disappears.
·          Press Ctrl+y. The typing reappears.
·          Select "Undo example."
·          Press Ctrl+u to underline.
·          Press Ctrl+z. The underline is removed.
·          Press Ctrl+y. The underline reappears.


Read More

Add Bullets and Numbers

Leave a Comment
Add Bullets and Numbers
In Microsoft Word, you can easily create bulleted or numbered lists of items. Several bulleting and numbering styles are available, as shown in the examples. You can select the one you wish to use.
EXAMPLES: Numbering

EXAMPLES: Bulleting

 EXERCISE 
Bullets
      ·          Type the following list as shown:
        Apple 
Orange
 
Grape
 
Mango
 
Cherry
·          Select the words you just typed.
·          Choose the Home tab.
·          In the Paragraph group, click the down arrow next to the Bullets button. The Bullet Library appears.
·          Click to select the type of bullet you want to use. Word adds bullets to your list.
Note: As you move your cursor over the various bullet styles, Word displays the bullet style onscreen.
To remove the bulleting:
·          Select the list again.
·          Choose the Home tab.
·          In the Paragraph group, click the down arrow next to the Bullets icon. The Bullet dialog box appears.
·          Click None. Word removes the bullets from your list.
Numbers
·          Type the following list as shown:
Apple
 
Orange
 
Grape
 
Mango
 
Cherry
·          Select the words you just typed.
·          Choose the Home tab.
·          In the Paragraph group, click the down arrow next to the Numbering button. The Numbering Library appears.
·          Click to select the type of numbering you want to use. Word numbers your list.
To remove the numbering:
·          Select the list again.
·          Choose the Home tab.
·          In the Paragraph group, click the down arrow next to the Numbering icon. The Number dialog box appears.
·          Click None. Word removes the numbering from your list.


Read More

Change Style Sets

Leave a Comment
Change Style Sets
Once you have applied styles, changing to another style set is easy. You simply open the Style Set gallery. As you move your cursor down the menu, Word 2007 provides you with a live preview of the effect of applying the style set. To choose a style set, you click it.
Change Style Sets
·          Click Change Styles in the Styles group. A menu appears.
·          Click Style Set. A menu appears. As you move your cursor down the menu Word 2007 provides you with a live preview of the effect of applying the Style set to your document.
·          Click Formal. Word 2007 reformats all of the paragraphs into the Formal style applying the appropriate format to each paragraph.


Read More

Apply a Style

Leave a Comment
Apply a Style
You can see of all the styles available to you in the style set by clicking the launcher in the Styles group and opening the Styles pane. You can leave the Styles pane open and available for use by docking it. To dock the Styles pane, click the top of the pane and drag it to the left or right edge of the Word window.
You do not need to select an entire paragraph to apply a style. If the cursor is anywhere in the paragraph, when you click on the style, Word formats the entire paragraph.
Apply the Title Style

·          Choose the Home tab.
·          Click the launcher in the Styles Group. The Styles pane appears. You can drag it to the side of the Word window to dock it. To close the Styles pane, click the Close button  in the upper right corner of the pane .
·          Click anywhere in the paragraph "Single-Parent Family—Career Help."
·          Click Title in the Styles pane. Word 2007 applies the Title style to the paragraph.
Headings and subheadings mark major topics within your document. With Word 2007, you can easily format the headings and subheadings in your document.
Apply Headings
·          Click anywhere in the paragraph "The Nature of Single Parenthood."
·          In the Style box, click Heading 1. Word reformats the paragraph.
·          Repeat steps 1 and 2 in the following paragraphs:
a)     Types of Single Parents
b)    Career Development Needs of Single Parents
c)     Career Development Programs
Apply Subheadings
·          Click anywhere in the paragraph "Displaced Homemakers"
·          In the Style box, click Heading 2. Word reformats the paragraph.
·          Repeat steps 1 and 2 for the following paragraphs:
a)     Displaced Homemakers
b)    Adolescent Mothers
c)     Single Fathers
d)    High School Dropout Prevention
e)     Established Education Sites
Alternate Method -- Apply Styles with the Ribbon
You can also choose styles by selecting the option you want from the Styles group on the Ribbon. First you must place your cursor in the paragraph to which you want to apply the style. Then you click the More button in the Styles group to see all of the styles in the currently selected set. As you roll your cursor over each of the styles listed, Word 2007 provides you with a live preview of how the style will appear when applied.
·          Select the paragraphs "Emotional Support" through "Parenthood Education" (they are probably on page two).
·          Click the More button in the Styles group.
·          Locate and click the List Paragraph style. Word applies the List Paragraph style to the paragraphs you selected.


Read More

Choose a Style

Leave a Comment
Choose a Style Set
When working with Word, you can use styles to quickly format your documents. A style is a set of formats consisting of such things as fonts, font colors, font sizes, and paragraph formats. Word 2007 supplies you with predesigned style sets that contain styles for titles, subtitles, quotes, headings, lists and more. The sections that follow all show you how to work with styles. The exercises are based on a file you must download. File. Click Save Target As from the menu that appears, and save the linked file to a directory on your computer.
The file will download as a zip file. A zip file is a file that is compressed. Compressed files are smaller and easier to download. To open the file:
·          Open the folder you downloaded the file to.
·          Right-click on the file name.
·          Click Extract All on the menu that appears. The Extract Compressed (Zipped) Folders dialog box appears.
·          Enter the folder you want to put the file in or except to suggested location.
·          Click Extract. Windows Explorer extracts the file.
·          You can use Microsoft Word to open the file.
Choose a Style Set

·          Choose the Home tab.
·          Click Change Styles in the Styles group. A menu appears.
·          Click Style Set. A menu appears. You can choose from any of the styles listed on the menu.
·          Click Simple. Word 2007 reformats all of the paragraphs into the Simple style by applying the Normal format to each paragraph.


Read More

Create a Hanging Indent

Leave a Comment
Create a Hanging Indent
The hanging indent feature indents each line except the first line by the amount specified in the By field, as shown in the example.
EXAMPLE: Hanging Indent
Hanging Indent:
The hanging indent feature indents the first line of the paragraph from the margin by the amount specified in the Left field. The amount in the Left field plus the amount specified in the By field indent all subsequent lines.


Create a Hanging Indent
·          Type the following: 
Hanging Indent: The hanging indent feature indents the first line by the amount specified in the Left field. Subsequent lines are indented by the amount specified in the Left field plus the amount specified in the By field.
·          Select the paragraph you just typed.
·          Choose the Home tab.
·          Click the launcher in the Paragraph group. The Paragraph dialog box appears.


·          Choose the Indents and Spacing tab.
·          In the Special field, click to open the pull-down menu.
·          Click Hanging.
·          In the By box, type 2".
·          Click OK.
·          Place the cursor after the colon following "Hanging Indent."
·          Press the Tab key. Notice that the indentation changes.


Read More

Align Paragraphs

Leave a Comment
Align Paragraphs
Microsoft Word gives you a choice of several types of alignments. Left-aligned text is flush with the left margin of your document and is the default setting. Right-aligned text is flush with the right margin of your document, centered text is centered between the left and right margins, and justified text is flush with both the left and right margins.
EXAMPLE: Left-Aligned
Sample Paragraph
On the Insert tab, the galleries include items that are designed to coordinate with the overall look of your document. You can use these galleries to insert tables, headers, footers, lists, cover pages, and other document building blocks. When you create pictures, charts, or diagrams, they also coordinate with your current document look.
EXAMPLE: Right-aligned
Sample Paragraph
On the Insert tab, the galleries include items that are designed to coordinate with the overall look of your document. You can use these galleries to insert tables, headers, footers, lists, cover pages, and other document building blocks. When you create pictures, charts, or diagrams, they also coordinate with your current document look.
EXAMPLE: Centered
Sample Paragraph
On the Insert tab, the galleries include items that are designed to coordinate with the overall look of your document. You can use these galleries to insert tables, headers, footers, lists, cover pages, and other document building blocks. When you create pictures, charts, or diagrams, they also coordinate with your current document look.
EXAMPLE: Justified
Sample Paragraph
On the Insert tab, the galleries include items that are designed to coordinate with the overall look of your document. You can use these galleries to insert tables, headers, footers, lists, cover pages, and other document building blocks. When you create pictures, charts, or diagrams, they also coordinate with your current document look.
The following exercises demonstrate how to justify text.
EXERCISE
Create the Paragraphs
·          Type Sample Paragraph.
·          Press Enter.
·          Type =rand(1) to create a paragraph.
·          Press Enter.
Right-align

·          Select the paragraphs you created.
·          Choose the Home tab.
·          Click the Align-right button  in the Paragraph group. Word right-aligns your paragraphs.
Left-align
·          Select the paragraphs you created.
·          Choose the Home tab.
·          Click the Align-left button  in the Paragraph group. Word left-aligns your paragraph.
Center
·          Selected the paragraphs you created.
·          Choose the Home tab.
·          Click the Center button  in the Paragraph group. Word centers your paragraph.
Justify
·          Select the paragraphs you created.
·          Choose the Home tab.
·          Click the Justify button  in the Paragraph group. Word justifies your paragraph.
Alternate Method—Right-Justify with Keys
·          Select the paragraphs you created.
·          Press Ctrl+r. The paragraph is now right-aligned.
Alternate Method—Left-Justify with Keys
·          Select the paragraphs you created.
·          Press Ctrl+l. The paragraph is now left-aligned.
Alternate Method—Center with Keys
·          Select the paragraphs you created.
·          Press Ctrl+e. The paragraph is now centered.
Alternate Method—Justify with Keys
·          Select the paragraphs you created.
·          Press Ctrl+j. The paragraph is now justified.


Read More